I Really like the sunflower look here. This is the iris and pupil of Erin's eye, super-saturated and put on a contrast cloud background.
December 26, 2009

December 12, 2009
BaldwinAuldLangSyne
created with the help of my wife and mom. The couple pictured are my Great Grandparents, the Jackmans. The Cemetary is the Fort Douglas Cemetery at the University of Utah.

December 06, 2009
Portfolio
Another assignment for the DigiPhotog class is what he calls baselines - we take several categories of pictures (indoor and outdoor portraits, an action shot, and a landscape) at the beginning of the semester and then take more of the same styles (but not necessarily the same subject) at the end of the semester. Here's what I've got so far, with the beginning of the semester on top and the end of the semester on bottom:
Action Shots:


Indoor Portraits:


Landscapes:


Outdoor Portrait: With this one, the top two were from the beginning of the semester. The rest were taken today and I'm having a hard time deciding which to use. Opinions?


Action Shots:


Indoor Portraits:


Landscapes:


Outdoor Portrait: With this one, the top two were from the beginning of the semester. The rest were taken today and I'm having a hard time deciding which to use. Opinions?


The 5-Panel Story
My Digital Photography teacher gave us the assignment to creat a 3-to-5 panel photo story. IT was to include some sort of text as well. Ideas evaded me for avery long time and Finally I came up with the idea of the christmas light story below.
The story's all in the pictures with the history-oriented text there to meet the text requirement. I got a 17 out of 20 on the assignment. He liked the idea generally but said panels 2 and 3 duplicated each other and panel 5 didn't "fit" the story and didn't carry the idea of the frustration with the lights that the other panels had. I like the resolution, personally. The idea of simplifying and leaving the commercialism of Christmas behind is appealing to me.


The story's all in the pictures with the history-oriented text there to meet the text requirement. I got a 17 out of 20 on the assignment. He liked the idea generally but said panels 2 and 3 duplicated each other and panel 5 didn't "fit" the story and didn't carry the idea of the frustration with the lights that the other panels had. I like the resolution, personally. The idea of simplifying and leaving the commercialism of Christmas behind is appealing to me.


November 25, 2009
landscape shoot
I went up to Wasatch Blvd tonight to do some shooting for my portfolio for my DigiPhotog class project. I took twenty-something pictures and came up with...nothing worth posting. But after some digital cleanup (YAY for photoshop!), these two came out pretty well:


November 07, 2009
Levi-ism from this morning
Emma and I were talking about how the broom we have is too big for her to use and I suggested we ask for one for Christmas. Levi came in from the other room and said "We can ask Santa for one and he will say mum ummm ummum mum-um inda back, so he means 'They're in the sleigh in the back.'"
Levi' sure funny this year. He has definite ideas about Santa's organization and job. He's also just positive that Santa's going to bring him a talking Thomas the Tank Engine. I'm not sure Santa knows how to make or find one of those, so we can only hope he comes through somehow.
Levi' sure funny this year. He has definite ideas about Santa's organization and job. He's also just positive that Santa's going to bring him a talking Thomas the Tank Engine. I'm not sure Santa knows how to make or find one of those, so we can only hope he comes through somehow.
October 27, 2009


More leaks, but it's workable
Well, asking Erin to handle the caulking on this version seemed to have worked for 3 days. We hooked it up on Friday night and it worked!

The Drains are draining and looking great!

Here are the pipes, leakless and working beautifully. Erin Caulked the tops of these in the 2x4 one day, then screwed in the tops the next day and caulked around the bottoms of those in the grow bed. Then she told me I wasn't allowed to touch or test them until Friday (3-4 days away) so they had time to completely dry. It worked for a bit because we had 3 days after filling, without tragedy or leaks.

Here's the grow bed filled with some rocks and water, looking all ready for planting. After 3 days, our peas had sprouted, which made the eventual leak all the more difficult.

Here's a wide shot of the full growbed and tank before I put the rocks in. The water is clear (though the bottom of the tank is carpeted in algae - that's a fight we're still fighting. Hopefully as the plants in the grow bed start to root and grow, they will suck up all the nutrients in the water and the alge will go away.) and beautiful.

Here's a pictyure of a leak - you can kind of see it against the white PVC. Two of the pipes leaked on the setup that Erin caulked - just out of the blue on Monday it started to leak and went onto the brick wall behind the tank and down the back of the tank. This was pretty worrisome because we were losing water and the water was going to places where we had electrical connections.
We sort of solved the issue by pulling off the supports from the side of the tank and removing the 2x4 shelves that the grow bed sat on. then we turned the grow bed 180 degrees so the pipes and holes were in the front and set the grow bed directly on the top of the light box. This looks better and gives more room for tall plants and a more even distribution of light. The problem is that the leak is still there. I need to switch out the pvc parts in the grow bed so that there's a more flush connection which should be more airtight. Someone on one of my fish forum websites also suggested that I use waterproofing thread tape instead of rubber o-rings, so I'll have to try that to see if I get a tighter connection.
For now, though, the leak is just putting the water in the front right corner of the tank and a little bit splashes out onto the recliner and floor next to the tank where we have a towel to catch it.
The other things that I learned in this process are:
1) Garlic does not grow aquaponically
2) garlic rots in water and gravel when the fish water can't cycle through the tank (we were trying to grow it in an old growbed version while we got the current version worked out)
3) rotton garlic will not come off of rocks easily - I've tried laundry soap and axe body wash, alternating soaking and rinsing. The rocks that were in the old grow bed still stink. I may have to try bleach, then a whole bunch of dechlorinator. I just really don't want to do that.
October 18, 2009
Well, the wooden Grow box failed 2 leak tests so That idea was scrapped. In order to make that work I'd probably have to coat the box (inside and out) in half an inch of silicone. I went back to trying to make a sterilite bin work. This time I drilled the 3 holes in the bottom, but the middle hole splintered so I upped that plumbing to 1 1/4 inch and caulked like crazy to try to fill the holes. then I tried to caulk again this morning. We'll take a look tonight and see if it's ready for a water test. I sure hope this works.
On the good side, though, The tank water is clearing. we can see the plants at the back wall more easily now, though the water is still a bit green and cloudy. Hopefully it will be clear soon. And, as a bonus, we don't seem to have lost any fish through this process!
On the good side, though, The tank water is clearing. we can see the plants at the back wall more easily now, though the water is still a bit green and cloudy. Hopefully it will be clear soon. And, as a bonus, we don't seem to have lost any fish through this process!
October 15, 2009
Things are looking up.
Yesterday was a pretty good day as far as the Awuaponic project goes. I found a new T5 strip that holds 2 bulbs at Home Depot for under $40 so that's helping the lack of light in the tank, I believe. Hopefully I'll eventually be able to get some lights for it that are the right spectrum. I think right now they have Soft White or Bright White and I want daylight or 6700K for them.
When I went to check on the drying drains, I foudn that I didn't have 1" female bushings, I had 1 to 3/4 inch reducing bushings. So I switched them out for another type of fitting whose name I can't remember right now, but this is probably a better thing because these fittings are taller so keep more water in the grow bed and they allow for the full 1" connection ( though it did take some additional drilling and caluking - the 3/4 in ch connection was tight so I had to make the hole bigger for the 1" connection).
You can't really see the down pipes inside the tank. I tried to cut them so they hide behind the black plastic rim at the top of the tank. The only place you can really see them is aove the light box:
(Sorry about the weird angle on this last shot. It was hard to get the shot at all because there's so little room between the tank/stand and the wall. )
From the back, you can see that only one pipe goes very far into the water. I think the other two just barely touch it.

In other news I managed to figure out why that cheap knock-off canister filter I originally bought wasn't working. The O-ring that seals the motor to thsomehow migrated off of the motor and was found my Levi and Josh. So I've got that back on now and it only leaks if you tip the canister. Also, it pumps much better now that I've got the stand tall enough to put the canister underneath the tank and removed all the filter media from the canister. I'm mainly just using it now to try to kill the algae with the UV bulb in the canister.
I may have to put some filter media back in because right now the flow rate's too high to expose the algae to the light for very long.
I have the XP turned off while the caulk in the grow bed dries. Hopefully the bacteria I have growing in there will survive while I wait. I had to turn it off because I've left the hose to the spray bar much longer than the hose from the intake so that it will reach the growbed. That was causing some cavitation and I didn't really want to lose/break the impeller and motor after spending so much money to buy the XP.
I also bought some fish the other day for the tank - I now have a gold Severum, 3or 4 Boesmani Rainbow fish and some other kind whose name I can't remember - they're a pretty blue-green.
So all in all a great day. I jsut hope that silicone hurries up so I can get the grow bed wet and make sure it holds water.

When I went to check on the drying drains, I foudn that I didn't have 1" female bushings, I had 1 to 3/4 inch reducing bushings. So I switched them out for another type of fitting whose name I can't remember right now, but this is probably a better thing because these fittings are taller so keep more water in the grow bed and they allow for the full 1" connection ( though it did take some additional drilling and caluking - the 3/4 in ch connection was tight so I had to make the hole bigger for the 1" connection).
You can't really see the down pipes inside the tank. I tried to cut them so they hide behind the black plastic rim at the top of the tank. The only place you can really see them is aove the light box:

(Sorry about the weird angle on this last shot. It was hard to get the shot at all because there's so little room between the tank/stand and the wall. )
From the back, you can see that only one pipe goes very far into the water. I think the other two just barely touch it.

In other news I managed to figure out why that cheap knock-off canister filter I originally bought wasn't working. The O-ring that seals the motor to thsomehow migrated off of the motor and was found my Levi and Josh. So I've got that back on now and it only leaks if you tip the canister. Also, it pumps much better now that I've got the stand tall enough to put the canister underneath the tank and removed all the filter media from the canister. I'm mainly just using it now to try to kill the algae with the UV bulb in the canister.
I may have to put some filter media back in because right now the flow rate's too high to expose the algae to the light for very long.
I have the XP turned off while the caulk in the grow bed dries. Hopefully the bacteria I have growing in there will survive while I wait. I had to turn it off because I've left the hose to the spray bar much longer than the hose from the intake so that it will reach the growbed. That was causing some cavitation and I didn't really want to lose/break the impeller and motor after spending so much money to buy the XP.
I also bought some fish the other day for the tank - I now have a gold Severum, 3or 4 Boesmani Rainbow fish and some other kind whose name I can't remember - they're a pretty blue-green.
So all in all a great day. I jsut hope that silicone hurries up so I can get the grow bed wet and make sure it holds water.
October 13, 2009
The Build continues
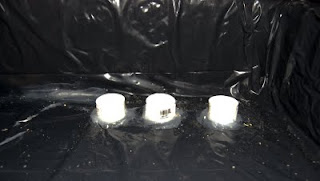
If you ever need proof that lights have different colors and that those colors affect plants, here you go. I have 5 lights over my tank in the DIY light box and those lights are 3 different colors. In the direct middle of the tank is a 100 watt light (I want to say it's a 5500k, but I'm not positive.) on either side of that light, you can see small circles of blue. Those are 90watt equivalent 6500K grow lights. That's close to the right color temperature but (amazingly) not bright enough for what I need. On the outside ends of the light box are 120 Watt Par38 Outdoor Flood lights. You can see at the ends of the tank that this is the only light that gets to the bottom of the tank as brightly as I'd like. Unfortunately, the color is wrong so it's still not helping the plants as much.

so what does that do to the water and plants? Well, Look at the next picture. Green Water and algae covered plants. No Fun! I'll have to look into other options for light which is really frustrating for me since I worked so hard to build that light box and thought I had a nice mix of color to keep the plants happy while letting it be bright enough for people to enjoy as well. Grrr....

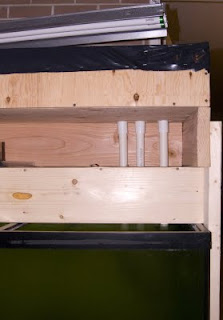
In this shot, you can see the holes I drilled. I will put the outflow from my canister in the diagonally opposite corner, facing the back of the box in hopes of avoiding any low-flow dead spots.

The original plan was to coat the box in sweet water epoxy to water proof it. Home Depot and Lowes don't sell that as far as I can tell, so I went with another plan. I spread clear epoxy around on the wood to fill holes and knots, then scattered white epoxy around the bed to acts as both waterproofing and glue for some black painter's plastic that I'm hoping will keep things waterproof.

In this pic, I have started to lay down the plastic and kind of rub it into place to bond it to the caulk, eliminate as many air bubbles as I can, and get it read to staple and trim. I just kind of threw the black plastic on the box, making sure that the lengthwise fold looked like it was in the middle, then I started smoothing from the middle out. i'm not sure how to fold or trim the plastic to avoid it bunching in the corners, but I'd like to have started at one end and worked my way across, smoothing as I went in order to avoid the air bubbles I still have a few of now.

The other problem I had was a small rip (the white you see in the photo) where one of the sides met the floor and there was an air bubble I was trying to push caulk toward. so I finished pushing caulk towartd it, hoping to fill the hole in the plastic and behind it. Then I caulked more over the top and smoothed it with my finger. Here's hoping it's enough to keep it water-tight.

After I smoothed the caulk and plastic as much as I had patience for, I stapled the plastic to the outside. I didn't do it a consistent distance between staples or anything, just shot the staples into where the plastic looked a bit loose.

Here's the semi-finished product. I will wait for a couple of days for the caulk to set, then I will use a razor blade to cut an "x" into the plastic at the drilled holes and try to install the PVC and DIY bulk heads.
on the location of the Holes I drilled - I kind of wavered between putting the holes halfway up the back wall and putting them where I did. In theory, with the holes halfway up (as I said in a previous post), it would hold some water in the tank if the power died or the filter/pump lost its siphon for some other reason.
This time around, though, instead of making the bulk heads with male and female bushings, I'm making them with female bushings and a Thread to smooth coupling. I think the female couplings will stick up into the grow bed enough that it will hold a small amount of water in the tank still, so I ended up going with holes in the bottom.
here's hoping it holds water. all that's left now is to wait and see.
Also in that last pic, you can see the coffee table/hamster cages that I built. That's just proof that even though I'm having difficulty with this particular project, I CAN actually build diy stuff that works. :)

so what does that do to the water and plants? Well, Look at the next picture. Green Water and algae covered plants. No Fun! I'll have to look into other options for light which is really frustrating for me since I worked so hard to build that light box and thought I had a nice mix of color to keep the plants happy while letting it be bright enough for people to enjoy as well. Grrr....

In this shot, you can see the holes I drilled. I will put the outflow from my canister in the diagonally opposite corner, facing the back of the box in hopes of avoiding any low-flow dead spots.

The original plan was to coat the box in sweet water epoxy to water proof it. Home Depot and Lowes don't sell that as far as I can tell, so I went with another plan. I spread clear epoxy around on the wood to fill holes and knots, then scattered white epoxy around the bed to acts as both waterproofing and glue for some black painter's plastic that I'm hoping will keep things waterproof.

In this pic, I have started to lay down the plastic and kind of rub it into place to bond it to the caulk, eliminate as many air bubbles as I can, and get it read to staple and trim. I just kind of threw the black plastic on the box, making sure that the lengthwise fold looked like it was in the middle, then I started smoothing from the middle out. i'm not sure how to fold or trim the plastic to avoid it bunching in the corners, but I'd like to have started at one end and worked my way across, smoothing as I went in order to avoid the air bubbles I still have a few of now.

The other problem I had was a small rip (the white you see in the photo) where one of the sides met the floor and there was an air bubble I was trying to push caulk toward. so I finished pushing caulk towartd it, hoping to fill the hole in the plastic and behind it. Then I caulked more over the top and smoothed it with my finger. Here's hoping it's enough to keep it water-tight.

After I smoothed the caulk and plastic as much as I had patience for, I stapled the plastic to the outside. I didn't do it a consistent distance between staples or anything, just shot the staples into where the plastic looked a bit loose.

Here's the semi-finished product. I will wait for a couple of days for the caulk to set, then I will use a razor blade to cut an "x" into the plastic at the drilled holes and try to install the PVC and DIY bulk heads.
on the location of the Holes I drilled - I kind of wavered between putting the holes halfway up the back wall and putting them where I did. In theory, with the holes halfway up (as I said in a previous post), it would hold some water in the tank if the power died or the filter/pump lost its siphon for some other reason.
This time around, though, instead of making the bulk heads with male and female bushings, I'm making them with female bushings and a Thread to smooth coupling. I think the female couplings will stick up into the grow bed enough that it will hold a small amount of water in the tank still, so I ended up going with holes in the bottom.
here's hoping it holds water. all that's left now is to wait and see.
Also in that last pic, you can see the coffee table/hamster cages that I built. That's just proof that even though I'm having difficulty with this particular project, I CAN actually build diy stuff that works. :)
October 11, 2009
Why pay someone when you can spend much more doing it yourself? Part 3

I was anxious to get the tank cycling (read about the Nitrogen Cycle Here) so I filled it the rest of the way and got some plants and feeder guppies in there.
I moved a lot of the plants I had in my ten-gallon tank over. They're suffering now because since I couldn't see to plant them due to the mud issue, they spent a lot of time just floating instead of getting planted. In addition, every time I need to move the tank or adjust something, I end up unplugging everything - the heater and the filter - so they've essentially starved and frozen. I've got things essentially settled in there now so we'll have to see what survives and starts to grow.


this is what the stand looks like now. It's seen a lot of changes.
1. We had to increase the height of the stand below the tank to accomodate a Canister Filter.
Until Last week or the week before, we had just been using a basic water pump, which doesn't allow for the growth of nearly as much beneficial bacteria. Also, the pump we were using was noisy and ugly and generally not what we wanted. I ordered a pump off of E-bay thinking it was a model that I'd heard a lot about but that the seller didn't know it's name so hadn't listed it. When we got it, it was a knock-off from china that had instructions poorly translated from Chinese. It also (at different times) leaked, refused to pump, and flooded our carpet. I tried and tried to modify it to work but finally gave up and bought a Rena XP3, which is working beautifully as I knew it would. Lesson learned: in Filters, you get what you pay for. It's worth coughing up the extra money for a decent filter.
2: the grow bed that I had on the Window was now shaded and blocked by the taller stand so the lights above it couldn't help it grow. That's why we came up with the idea of moving the tank to a wall, then suspending the grow bed above the tank. The other reason we did this is that another version of Grow Bed that we'd tried was to get some long planter boxes and put them on a frame directly in the top of the fish tank so that the water would only come part-way up the planter box and the plants could have the water's nutrients and the air at the same time. This sort of worked, but in combination with the Do-it-Yourself lights, it completely blocked the top of the tank so that we couldn't re-plant anything or feed the fish. for this reason also, we moved the grow bed above the tank.
3. In the new tank stand, I have mounted power strips near the roof, so that the wires can stay somewhat organized without much chance of getting wet (unless the water is aimed directly at them, which is unlikely).
4: You can't see it in the picture, but there is an in-line heater behind the tank to add a bit of redundancy. If the in-tank heater fails (or vice-versa), there's another one to keep everything alive and running smoothly.
Future Plans:
I still need to set up plumbing from the grow bed to the tank. I will use 1" PVC for most of the drain and will build a Bell Siphon around the drains or maybe just a constant flow drain if 2-3 1 inch drains will be enough to prevent things from flooding. Either way the pipe will guide the water downward either at the front or back of the grow bed and back into the fish tank. I'm partial to the drains being at the back so that I can hide them in the tank with plants, but then I'll need more tubing going from the filter to the spraybar in the grow bed and I'm not sure what that would do to the canister filter's siphon process.
Why pay someone when you can spend much more doing it yourself? Part 2
Had to break this up a bit so I didn't seem too long-winded. :)

This was one of the ideas of my own that I liked the most. I'd never heard of a PVC drain when starting this project, so ended up making my own. That's a 1/2 inch PVC 90 degree elbow with a sink filter caulked into it. It's great for keeping fry (fish Babies) out of the filter.
Sadly, it also seems to make the filter suck in air somehow, though I'm not sure how or why. With Canister filters, that can lead to cavitation, which can hurt the impeller (the part of the filter that spins around in the motor to actually pump the water). With my filter, An XP3, I know I can replace the impeller when needed and I've read on several Aquaponics websites that the plants need a lof of oxygen, so I'm wondering whether I shouldn't just allow it to stay on the canister intake or not. I need to do some more research on cavitation, I guess.

This is the Grow Bed. (or one version of it that we've tried.) In Aquaponics, fish tank water is pumped to a grow bed that is filled with some sort of media. The aquaponics kits you can buy for several hundered dollers use baked compressed clay because of its ability to hold moisture and nutrients for the plants to use. I was trying to save money and used the moss and perlite combo mentioned before with some rocks from outside our house, some epoxy coated aquarium gravel, and some pool filter sand. This didn't allow for enough flow to the tank return pipe and the pool filter sand continued to grind skin off my wet hands when I'd try to work with it.
In the setup in the picture, there is one input and one output. I nearly flooded our kitchen several times (and di create several large puddles) trying to get the flow right on this setup. I never did get it right. the Grow bed is proving to be one of the trickiest things to figure out (and I still don't have it figured out yet!)


In these pictures, you can see the outflow plan. I was trying to fill the tank without disturbing the substrate. The muddy water in the second picture shows you how unsuccessful I was.
the grow bed connections were done with Do-it-yourself bulk Heads made by putting rubber o-rings on both sides of the holes I'd drilled in the plastic, then squishing that against the plastic with a female flush-bushing on the inside of the grow bed and a male bushing piece on the outside. That would then connect to a ball valve to try to control flow.
What I should have done:
1. Use bigger PVC for the outflow/drains. 1/2 inch just doesn't seem to drain as well as it should. that small is fine for the inflow, but the outflow needs more help.
2. Keep the holes even. I drilled the holes in an impatient hurry so the hole saw splintered the plastic and made a jagged edge. Just like with drilling a fish tank, if you have any pressure at all besides the weight of the drill (assuming it's a light drill), the hole becomes jagged and harder to create a water-tight seal against.
Also, on the first grow bed version, I put the inflow hole as low as I could on the growbed and the outflow hole in about the vertical middle. I changed this on the next vesion because if your pump stops for any reason at all, the inflow hole becomes an outflow hole and your whole grow bed dries out, potentially killing your seeds. By having both holes at least mid-way up the grow bed, if the power goes out, there's a little water left in there for your seeds. That's for if you want a constant submerged aquaponic sytem. (learn about the different aquaponics systems here). If you'd prefer Ebb and flow, maybe the holes having different heights is what you want.
3. Use More holes.
I eventually did end up putting more outflow holes in. This helped it drain faster, but still with 1/2 inch PVC, I needed a lot of holes. I have 4 in that particular grow bed now and it's still not enough. Plus, with more holes, there's more places that can (and do) leak.
Subscribe to:
Posts (Atom)